Using your Foraging Journal
How to use our integrated foraging journal feature to record and track your foraged finds!
Written By Jesse Feral Foraging
Last updated 12 days ago
This guide will walk you through everything that you need to know to start using your personal foraging journal in Gather!
Like the rest of the app, this feature was built from the ground up by foragers for foragers. We use it ourselves and (having tested every other option out there) know it is by far the most seamless experience for tracking and documenting all of your foraged finds!
Accessing the journal
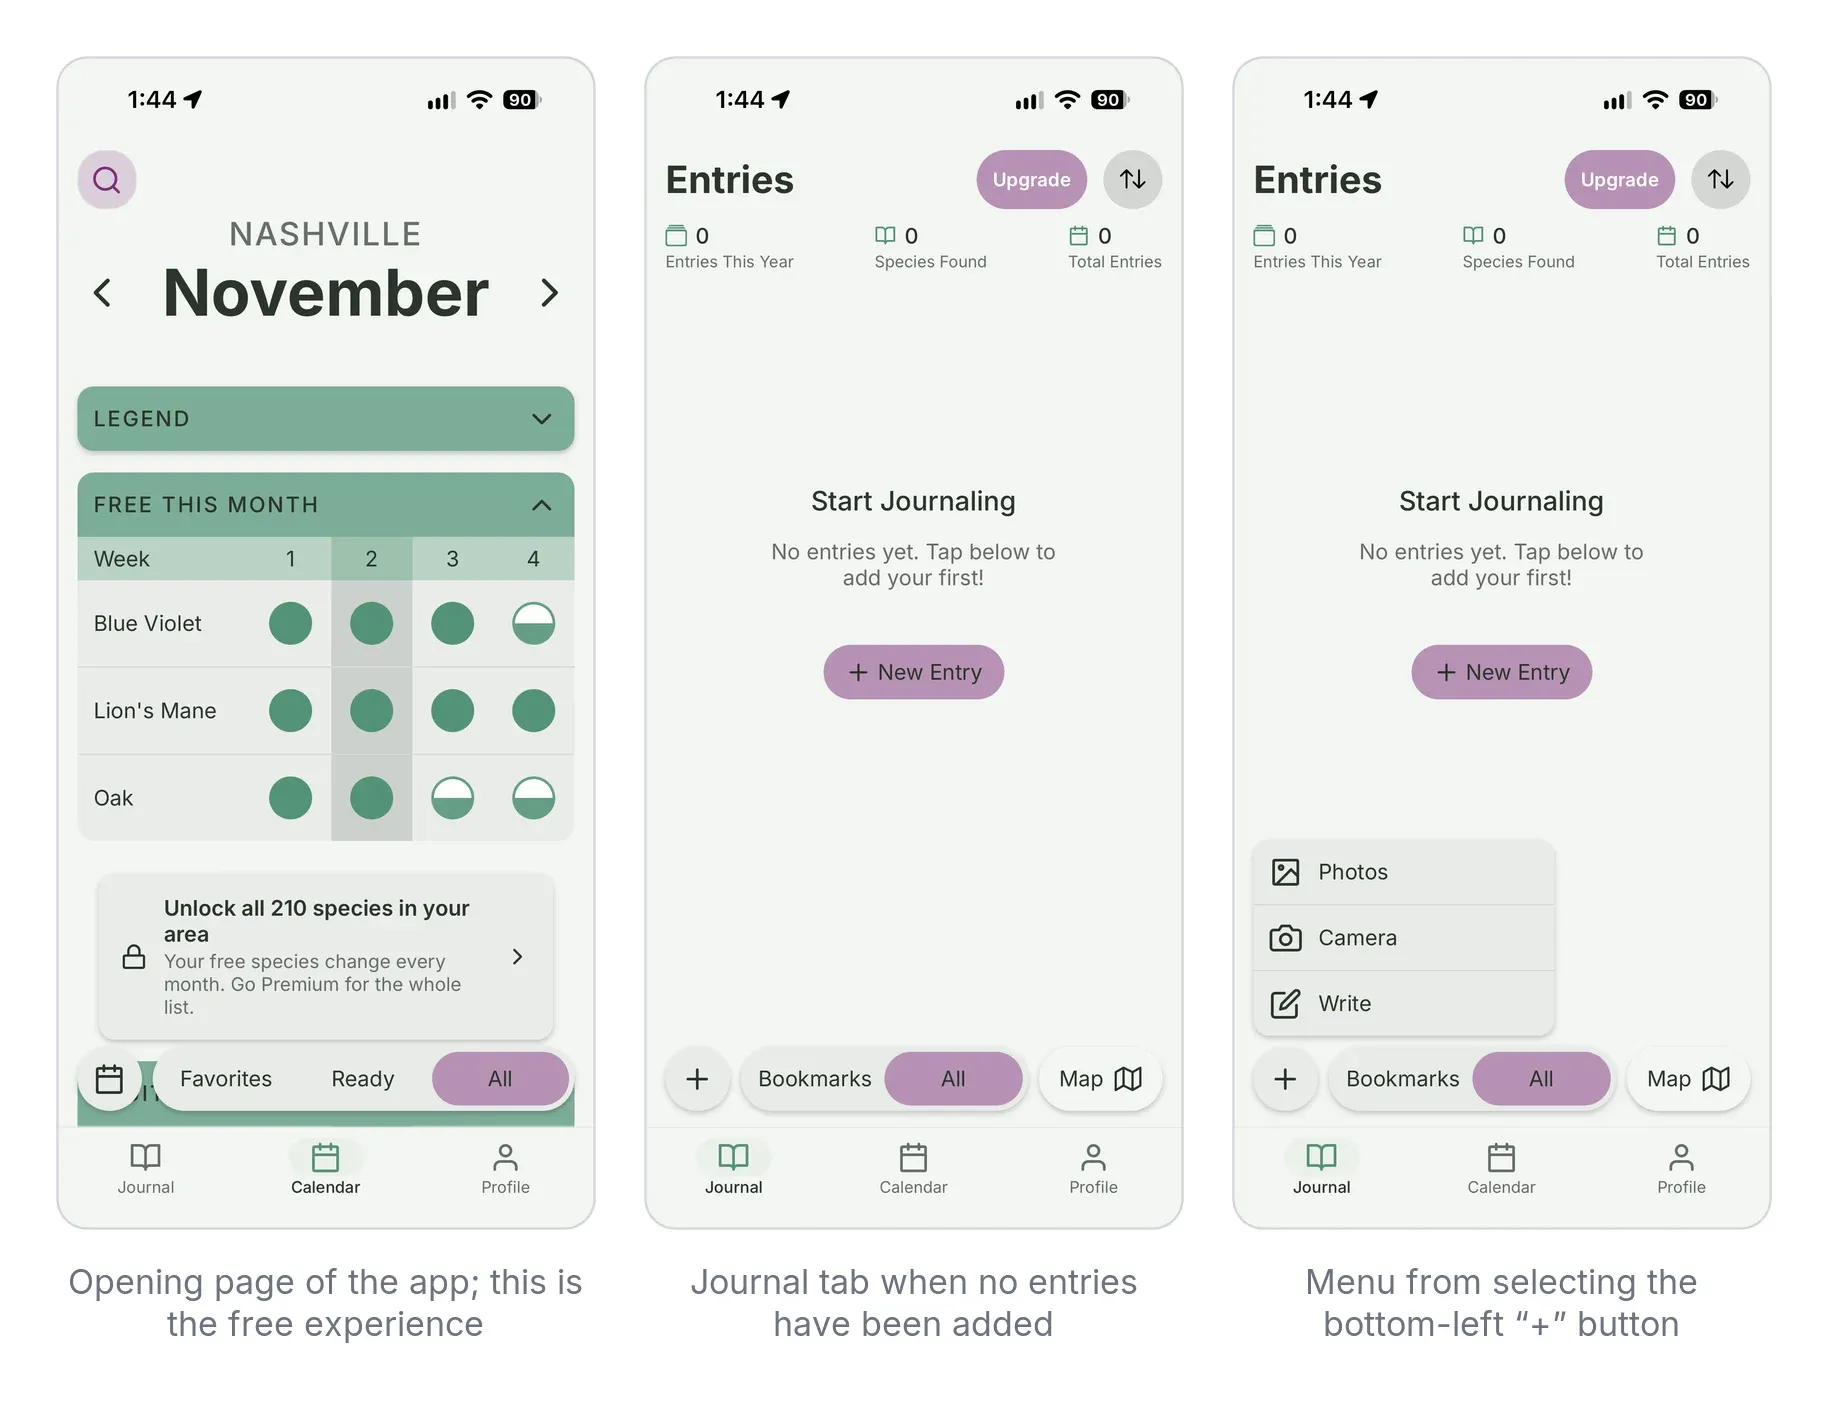
Your app will open on the calendar page, so you can tap the bottom-left tab “Journal” to access your journal page.
If this is your first time using the journal, you're just going to see a message saying "No Entries Added"; otherwise, this will open up to your list of journal entries, starting with the most recently added.
Next, we’ll go over how to start adding entries.
Adding a journal entry
Tap the "+" button in the bottom left to begin
You can use one of three options to create a new entry:
Photo (Recommended): Select existing photo(s) from your gallery to create an entry based on those images. This will take you to our Photo Import Tool (See below for how to create an entry directly from your phone’s photo library)
Camera: Use this to take a new photo to create an entry of something you just found in the field. (We recommend just taking photos with your camera first and then using the photo option above instead)
Write: This option allows you to create an entry without any photos if you don't have any media for that entry yet.
If you chose the recommended “Photo” option in the previous step, you’ll be in our Photo Import Tool.
Using the Photo Import Tool
This page is designed to make it easy for you to quickly add and group together previous finds, no matter how old they are! Here’s how it works.
Group photos quickly and easily
If you’re like me, when you are out in the field, you take a lot of pictures of the species you find, but then forget which photo went with which specimen.
We provide a map at the top that shows you the pins associated with each photo you’ve included, along with the date and time the photo was taken.
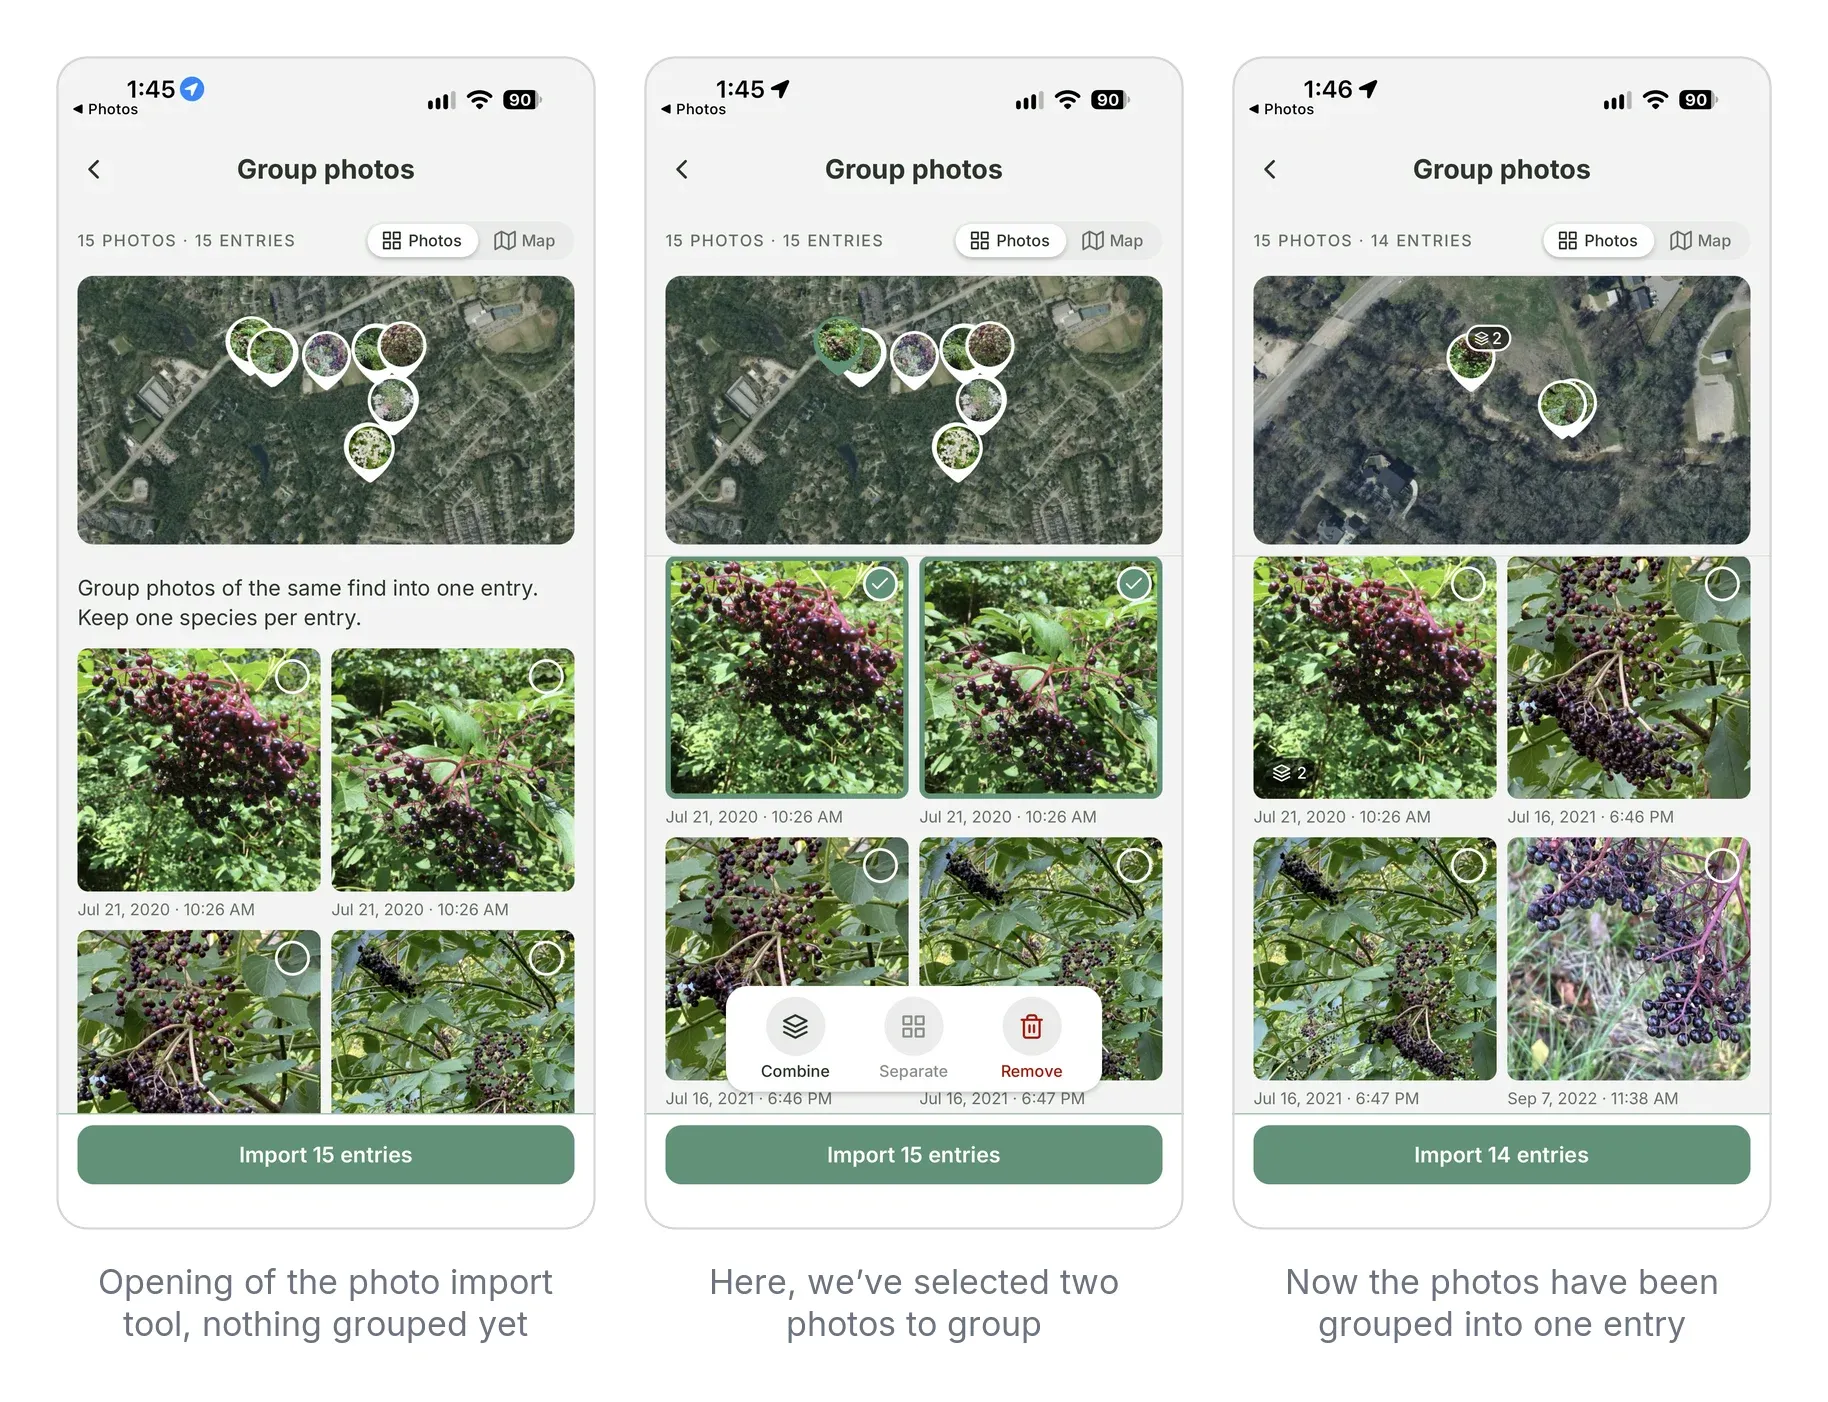
With these two details, it's easy to see which photos should be grouped into an entry.
You can import up to 50 photos at a time, and you can group up to 8 photos per entry.
You can also view the entries in a full map view where you can pinch to zoom and move the map around to select entries to combine that way.
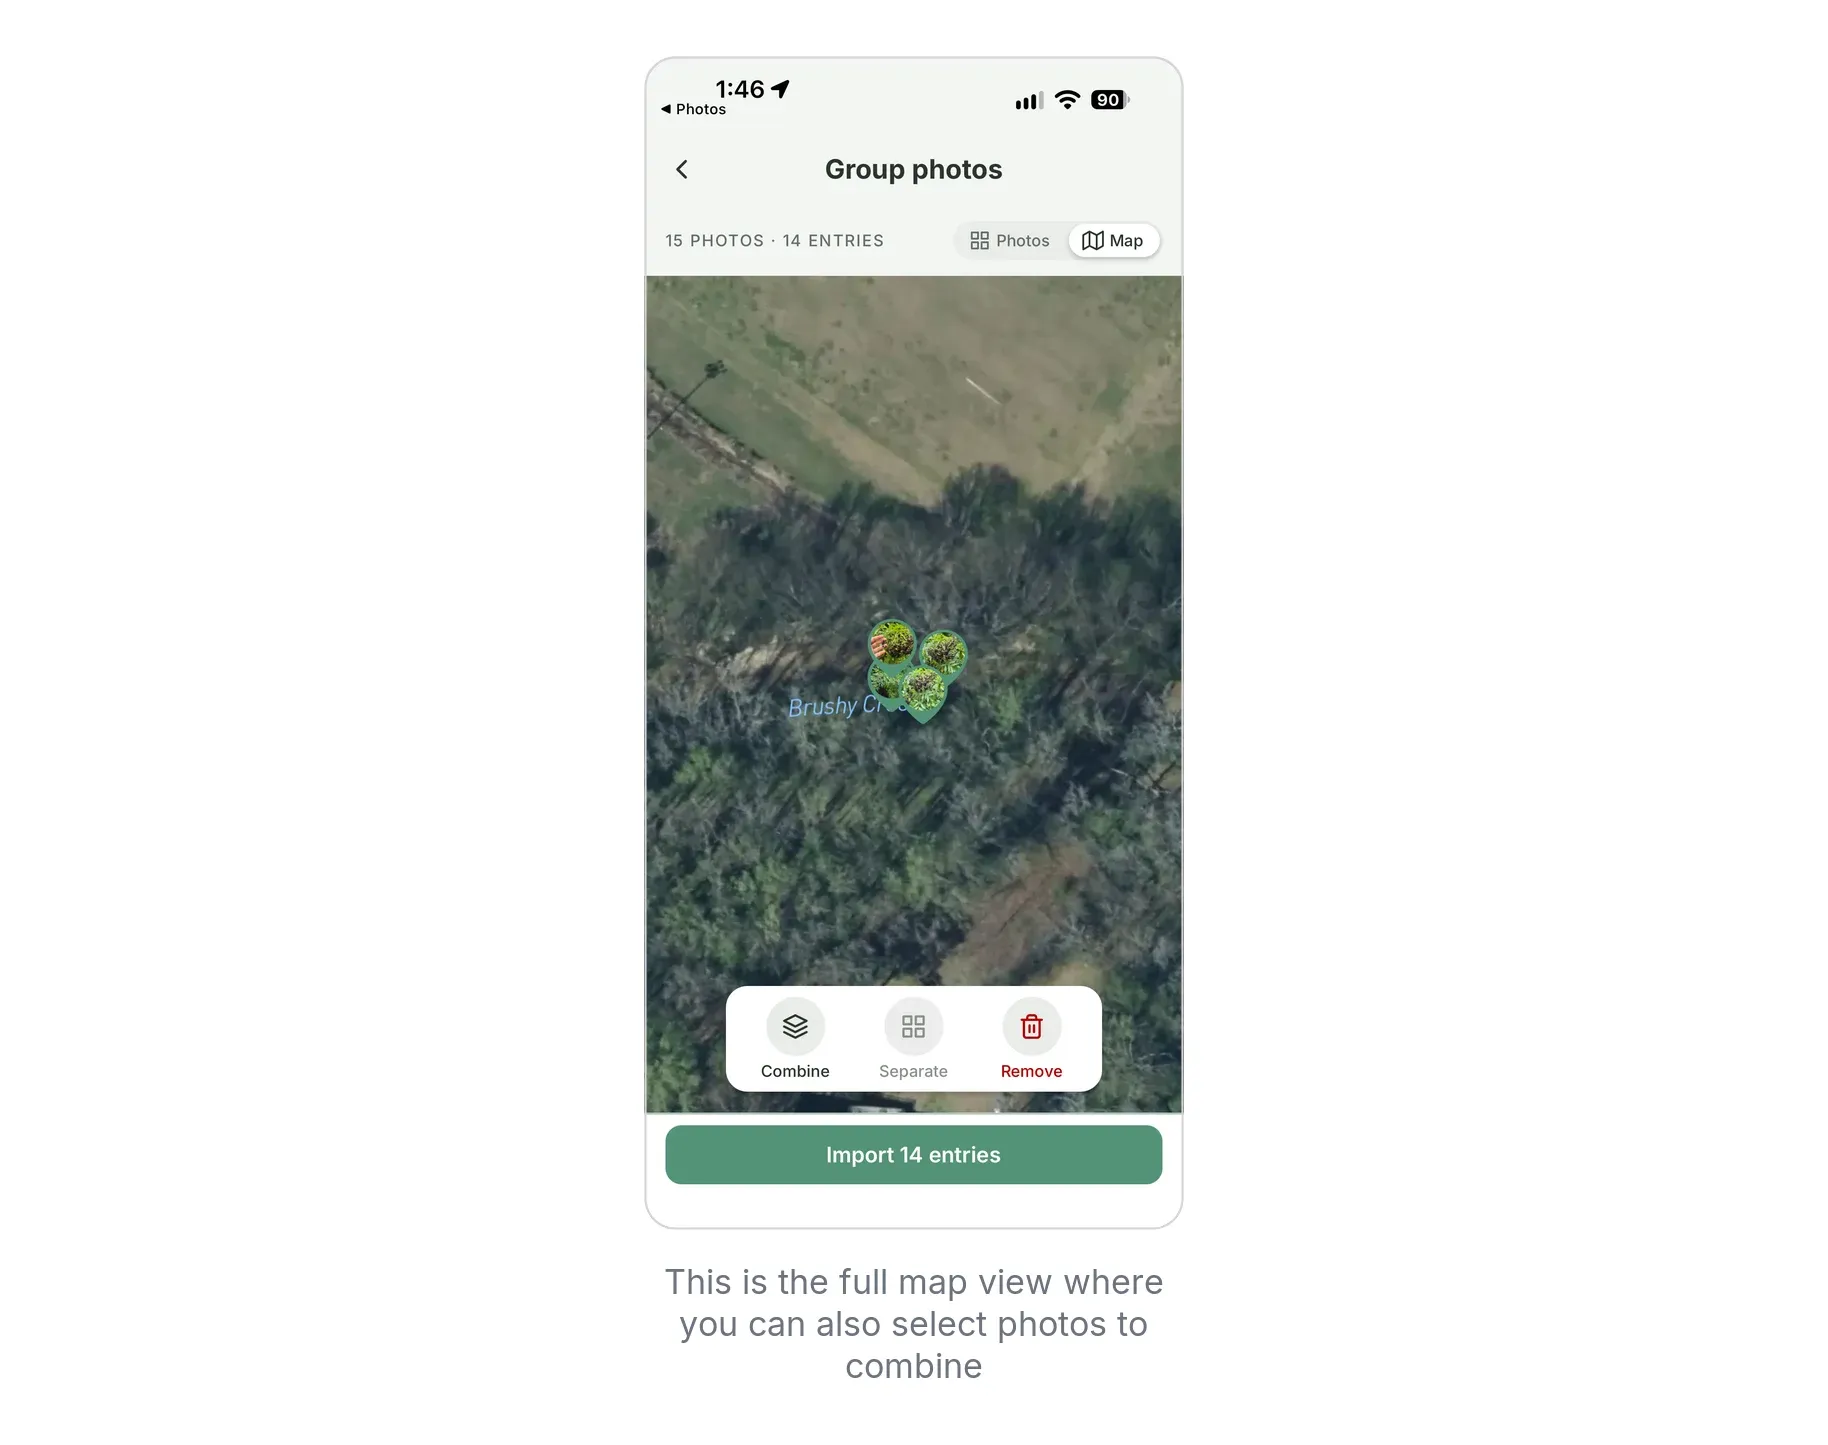
Once you’ve grouped your photos into the correct entries, press the “Import X entries” button to move on to the next step.
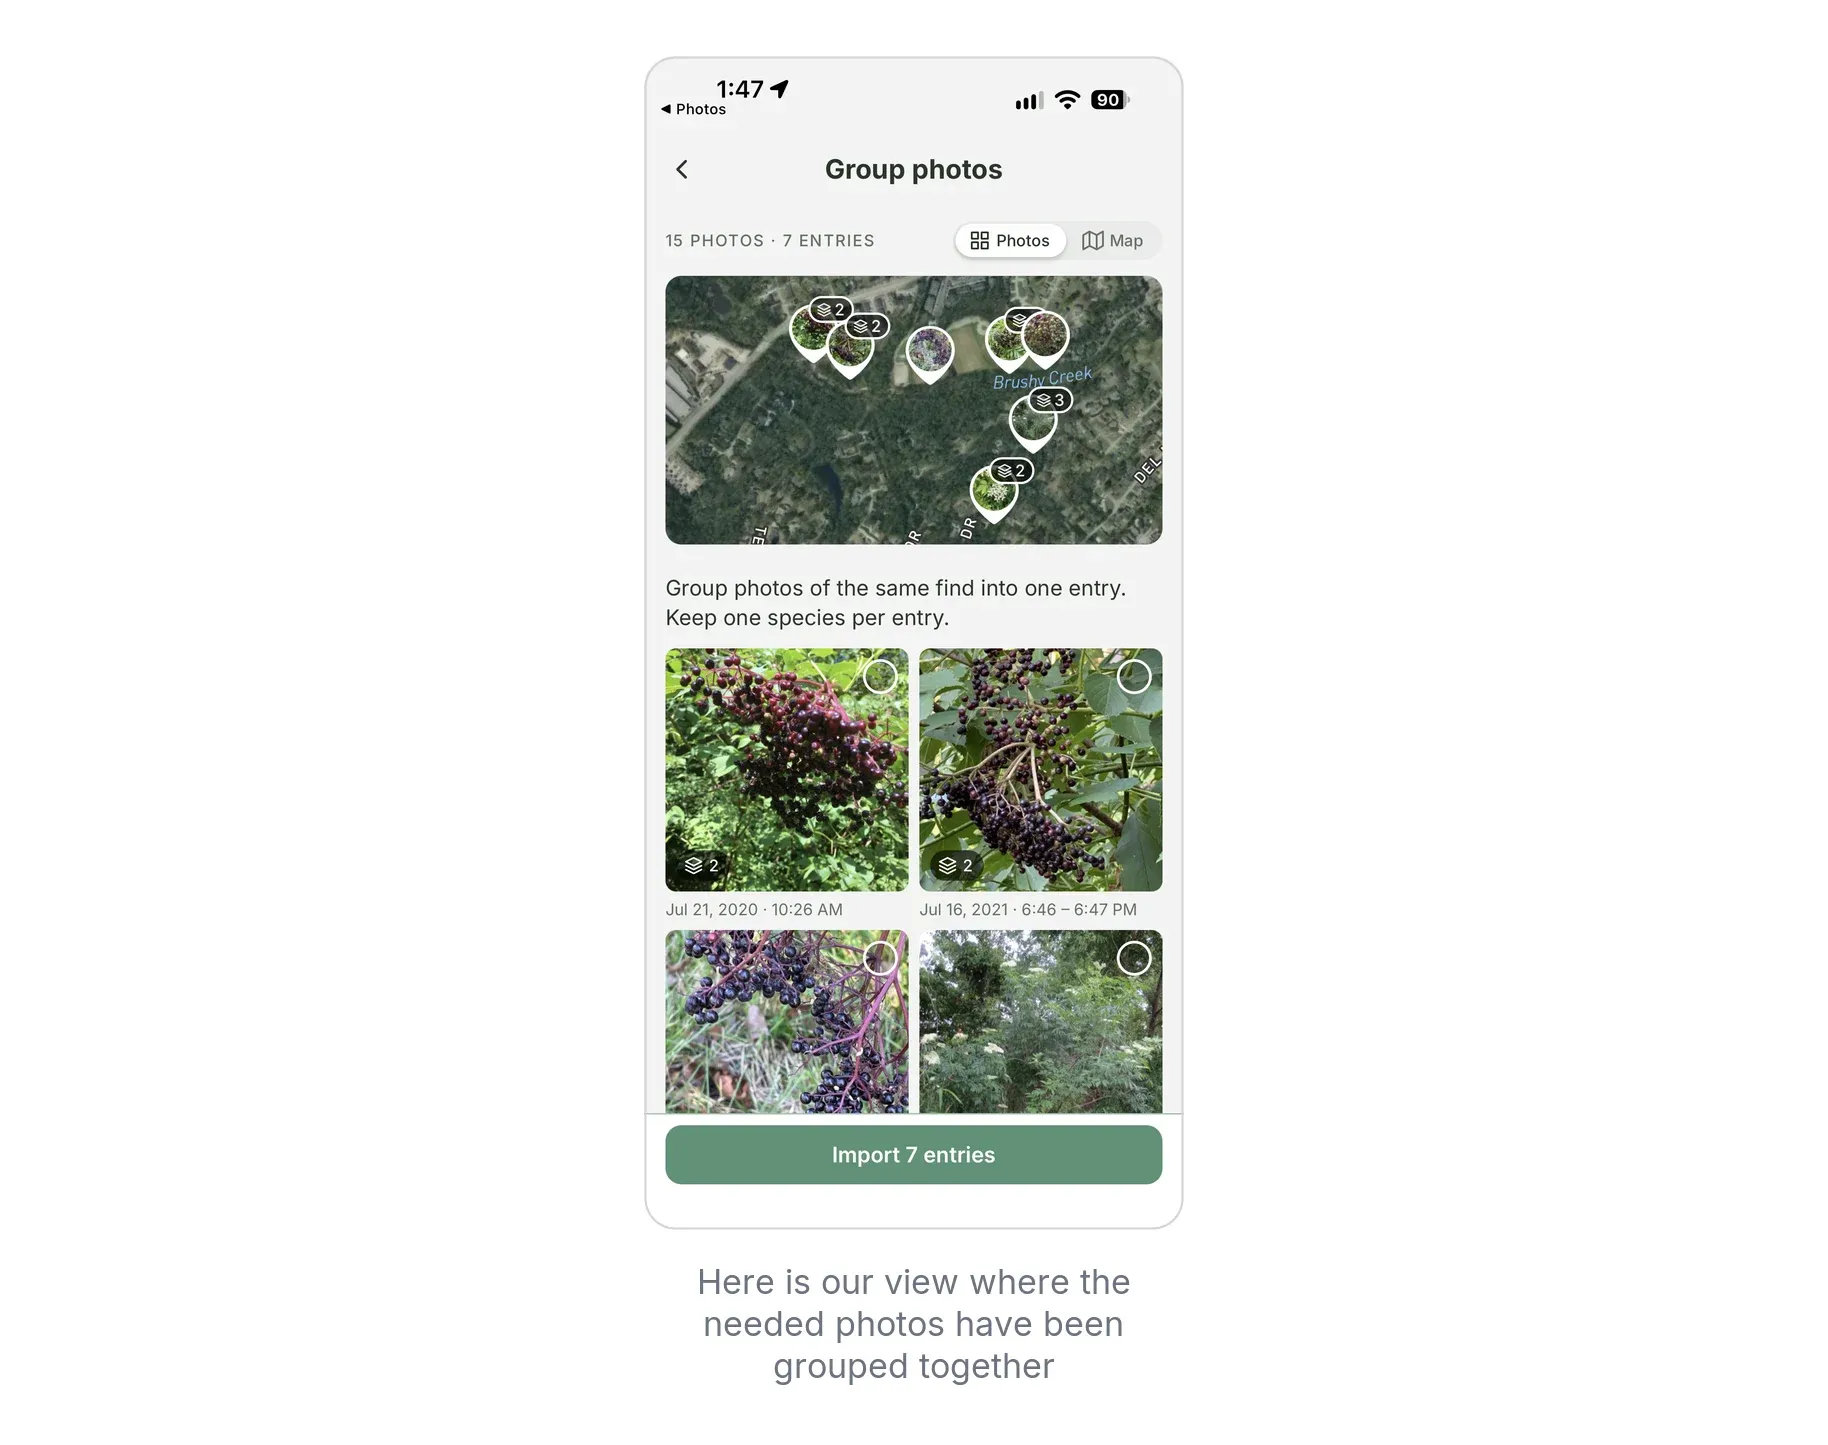
Edit individual entries
Now you’ll be able to swipe through each of the resulting entries from your photo groupings. This is where you can build a helpful journal to allow you to more easily time and gather wild food and herbs in the future. Pay special attention to the species and seasonal stage for that!
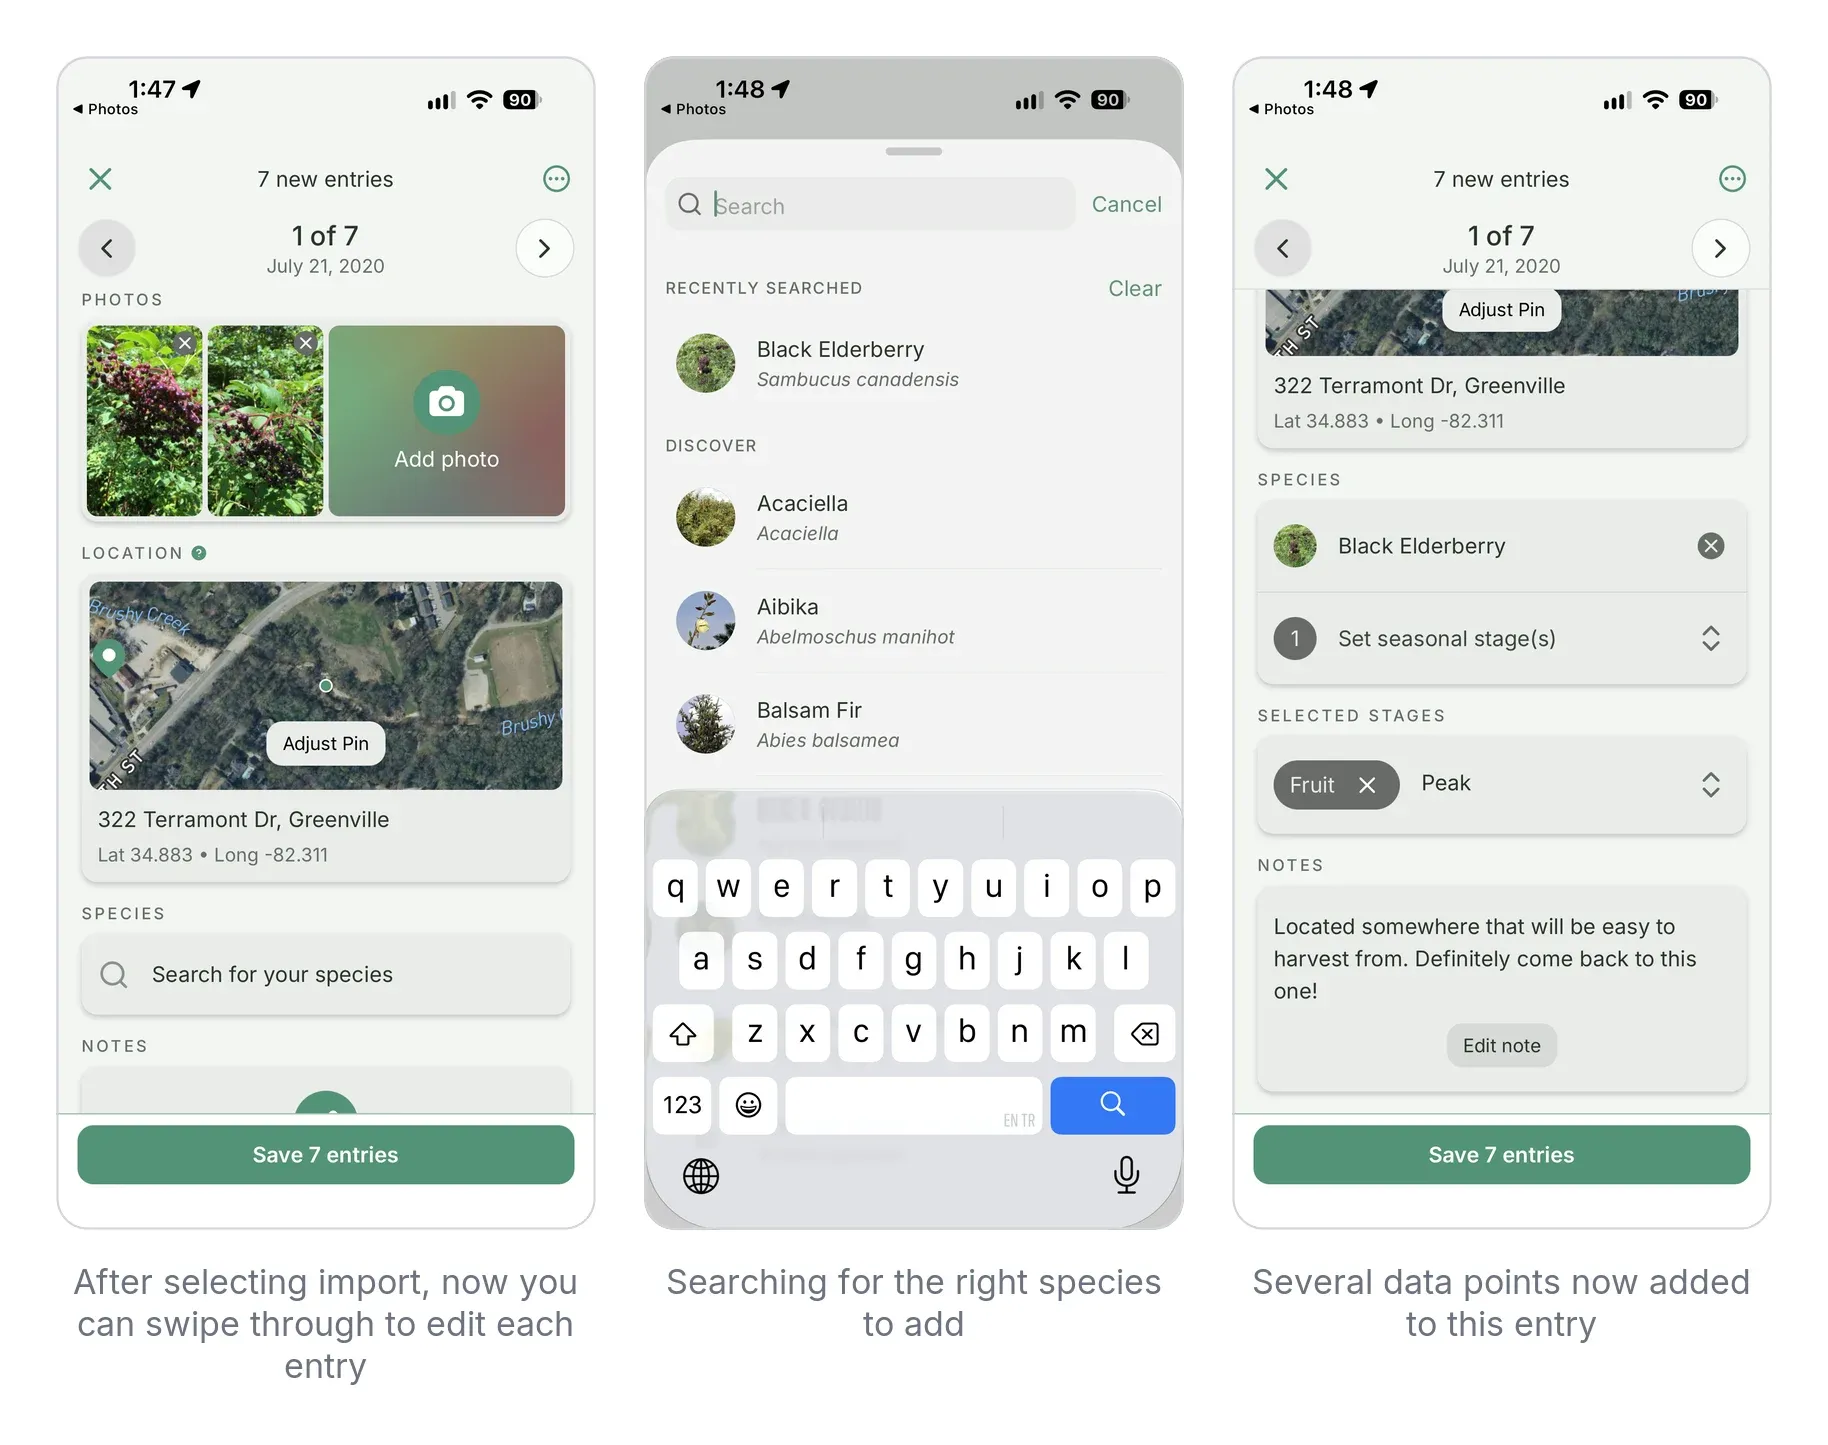
Some fields may already be filled, depending on how much metadata was in each photo. Here are all the possible fields. Pay special attention to the
Date: The entry date is at the top of the screen. If you selected photos from the past, we will automatically set the date to when the photo was taken. You can always change the date by tapping the three-dot icon to the right.
Photos: The photos you added from the previous option, plus the ability to add more if needed.
Location: The location of your foraged find for this entry. This is private by default! In the future, we'll give you the option to share this with others, but for now, it is only visible to you. This will often be automatically filled from the photos that you selected, but you can also change it by tapping "Adjust Pin".
Species: The species of your foraged find. If you don't know, you can leave this blank, or if you know the genus but not the species, you can select that instead. (e.g., you know it's a bramble berry, "Rubus," but not the exact species) Selecting the species unlocks the next two fields. (Note: we are looking into incorporating species recognition technology in the future to help with this step.)
Seasonal Stage: Here you can select the seasonal stage(s) that are present at the time of your find. For instance, if you found a raspberry that is fruiting, you can select "Fruit". You can also select multiple stages if applicable and specify the exact point of the stage with the next option.
Phase: This will appear after you have selected a seasonal stage. Here you can specify the phase of the seasonal stage(s) that you selected. For instance, if you found a wild strawberry, but it was green, you can select "Fruit" and specify the stage "Early". If it was fully ripe (the best time to forage), you can select "Peak", and if it was overripe, you can select "Late".
Notes: Finally, you can add any additional notes about your find here that you'd like to reference later.
Once you have filled out all the fields you'd like, tap "Save" in the top right to save your entry! This will take you back to the journal entries page, where you can see your newly created entry along with any others you've made.
That's it! You've successfully created your first journal entry. You can always tap the three dots in the bottom right of any entry from the entries page to edit or delete it in the future if needed.
Add photos directly from your photo library
For adding many entries at once, especially if you’re adding ones that are further in the past, this is our recommended approach.
The reason is that you’ll not have to scroll back to the previous spot in your library for every entry you make. After importing up to 50 photos, you can go back to your phone’s photos app, and you’ll be right where you left off!
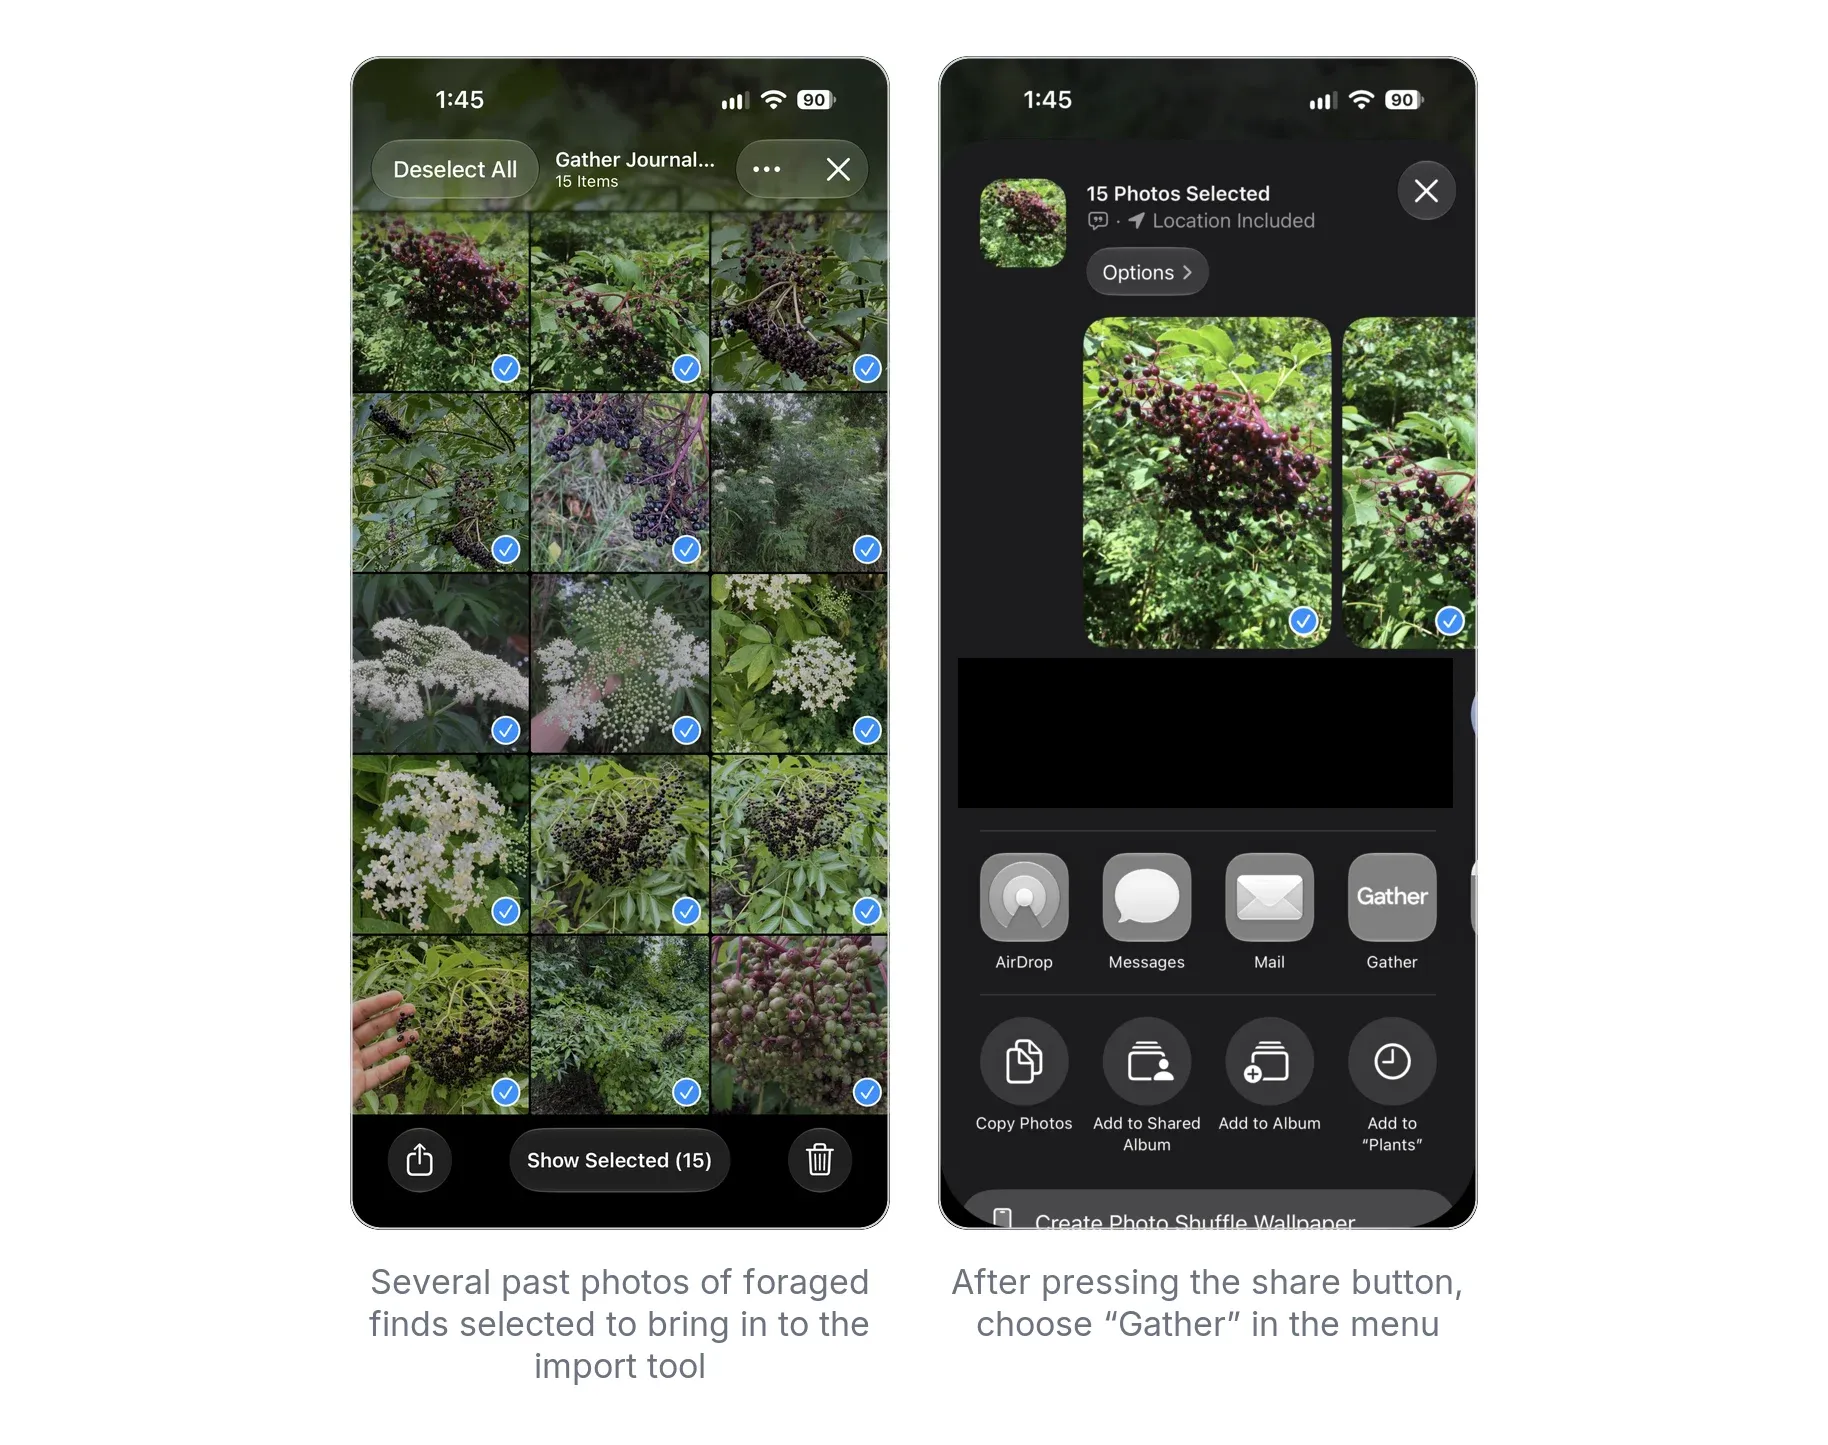
Open your photos app and simply select the photos that you’d like to use for a new entry, and then press the ‘Share’ option. You may need to swipe or scroll to find the Gather option.
(Note: if you select more than 50, you won’t see Gather as an option in your share menu.)
This will open up your Gather app, where you’ll be on the Photo Sorting Tool screen with the photos you selected.
Using entry reminders
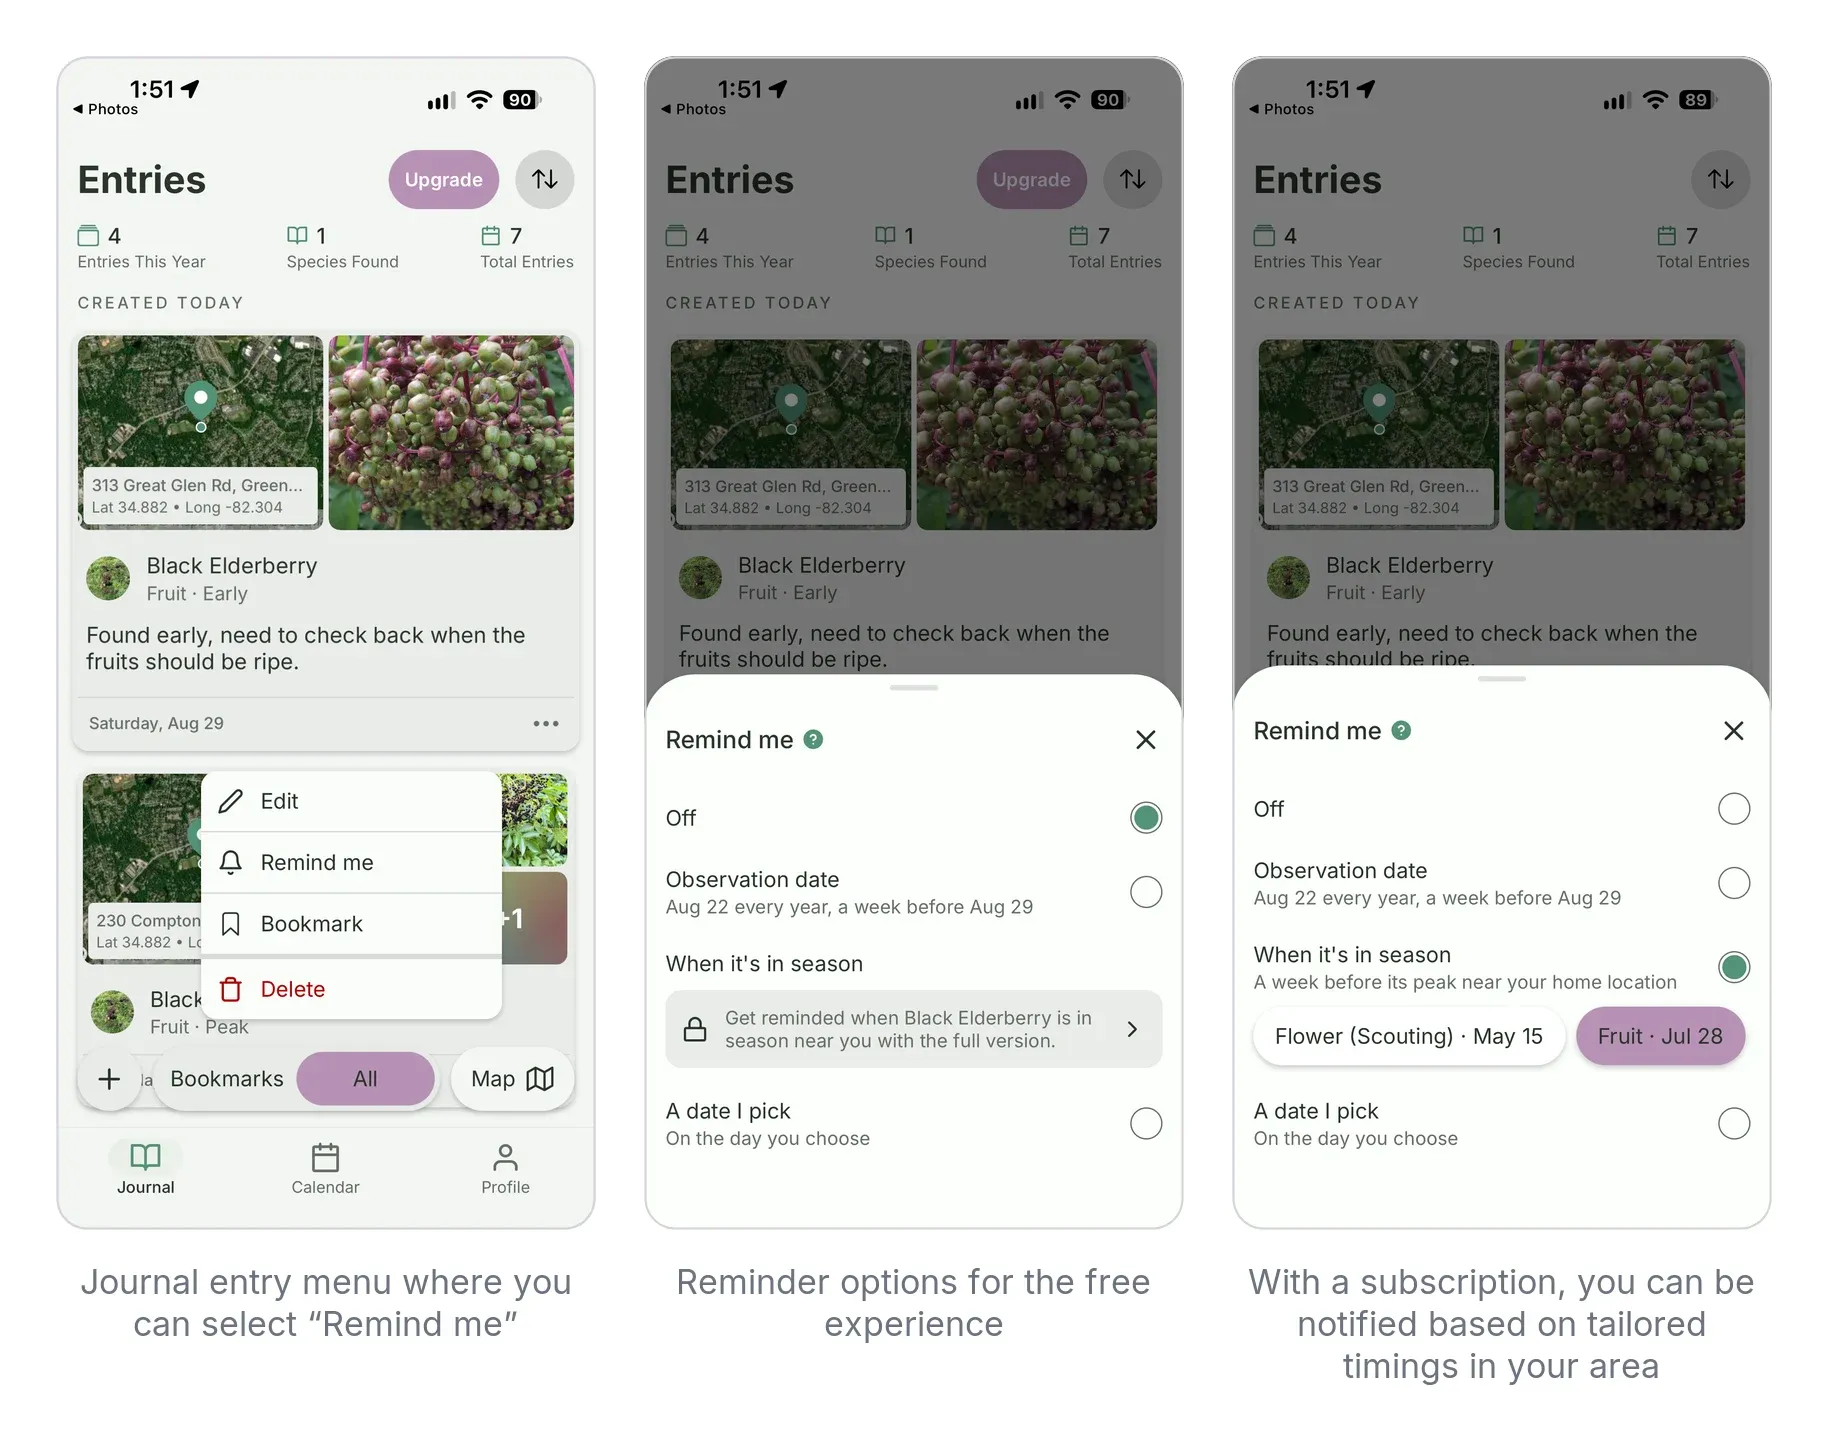
One of our favorite and most powerful features that you can use with your journal entries is the Reminders tool.
Very often, you’ll come across an edible species in the wild, but not at the right time to gather it. If you log it in a journal entry, you’ll be able to set a reminder to check on that spot again at the right time. There are three options for this:
Observation date: We’ll notify you one week before the date the journal entry was observed
A date I pick: You can choose any day of the year, and we’ll send you a notification then
When it’s in season: This is the only option that requires a paid subscription for Gather, and you can use it to be notified when that species is in season using our tailored timings for that species in your area.
Using the entry filters
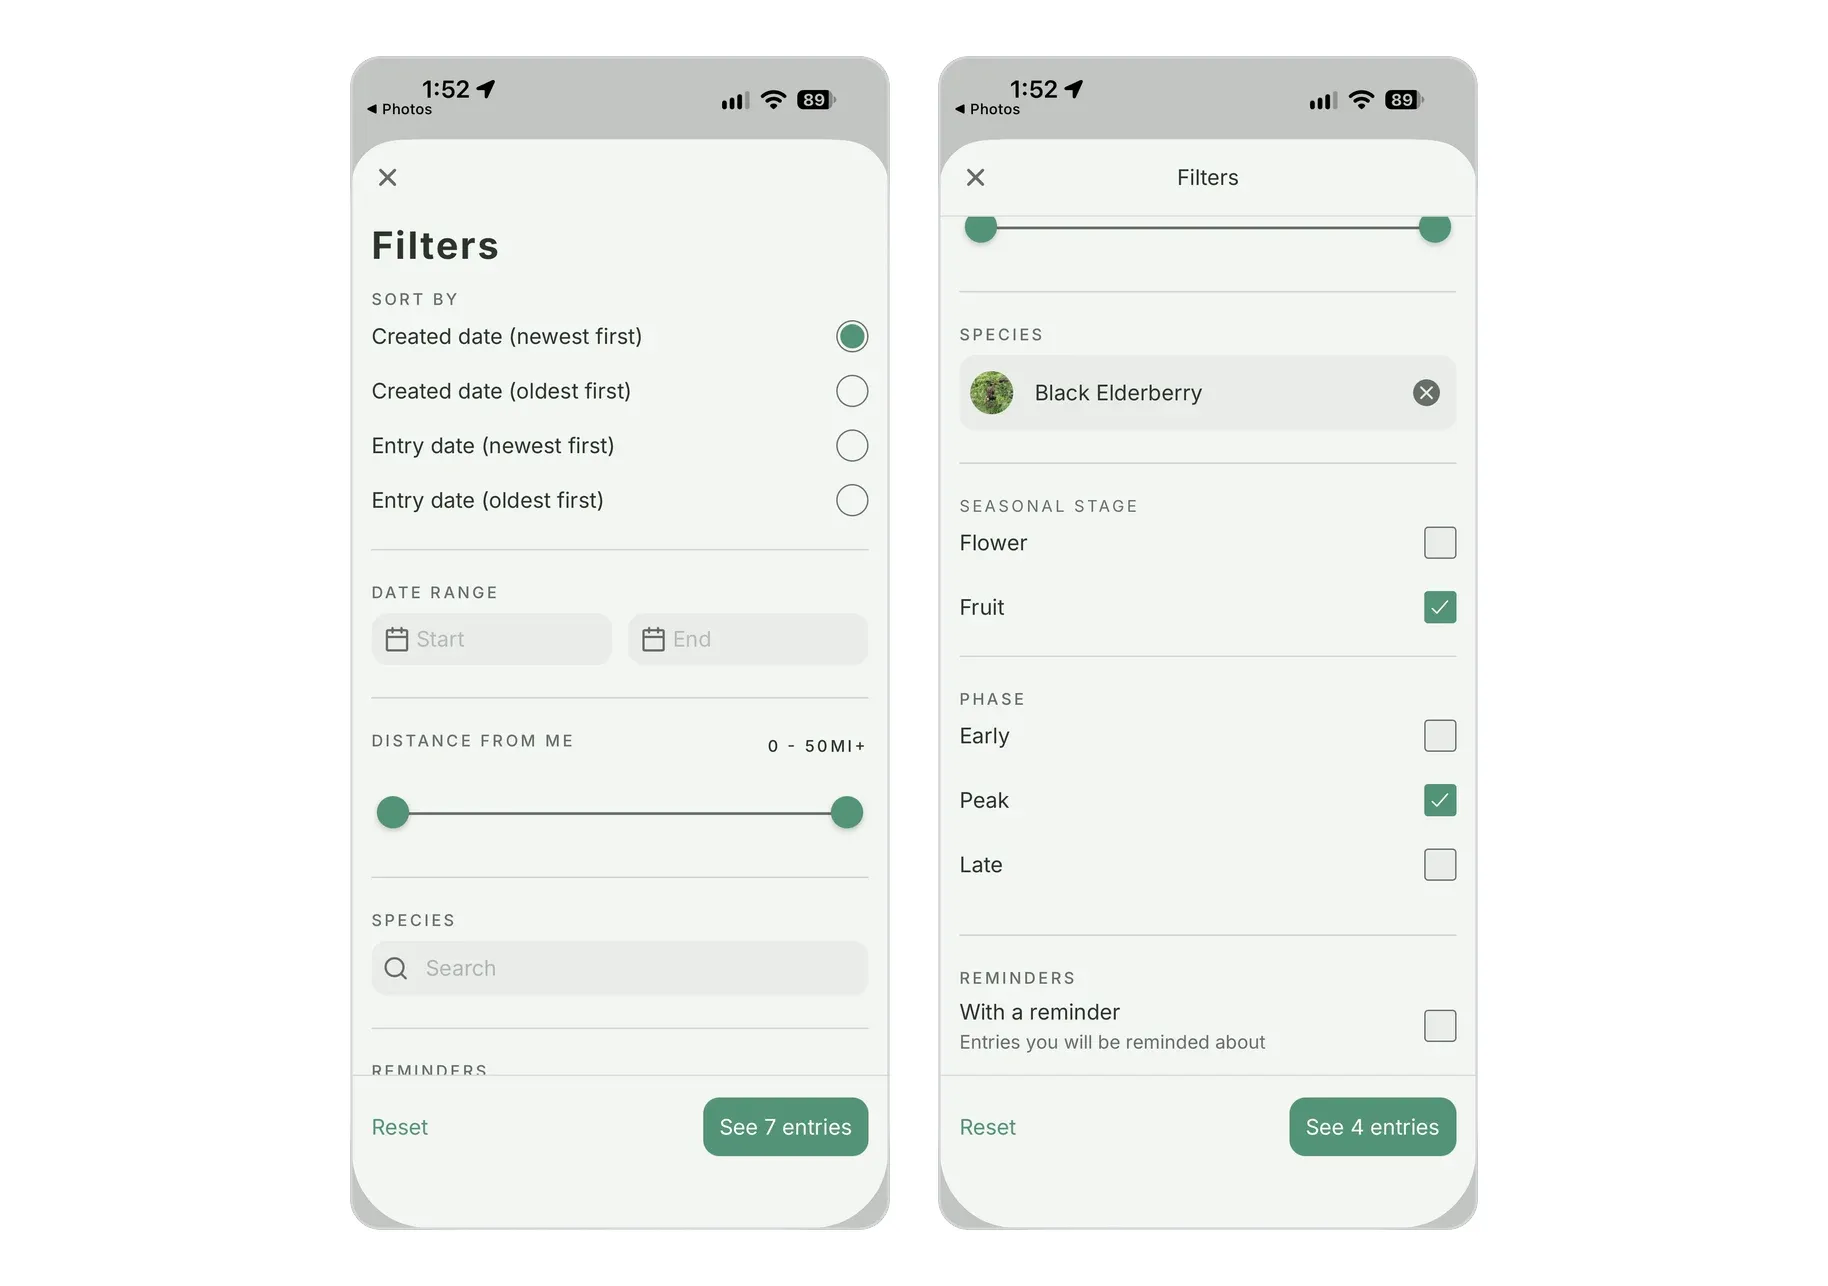
At any time, you can bookmark an entry and quickly use the "Bookmarks" filter at the bottom of the entries page to view only those entries, but we have far more filters available as well.
Sorting: From the filters page, you can also change the way that entries are sorted. By default, they'll be shown by the time they were created, but you can also sort them by the time they occurred (the date of the entry).
Date Range: You can filter entries by a specific date range if you're looking for something from a particular time of year.
Distance From Me: Let's say you have traveled to one of your favorite foraging spots and you want to see what you've found in that area before. You can use this filter to show entries within a certain distance from your current location.
Species: If you want to see all the entries you've made for a particular species, use this filter. It will also unlock the following two filters.
Seasonal Stage: After selecting a species, you can filter entries by the seasonal stage(s) that were recorded for that species.
Phase: Finally, after selecting a species and a seasonal stage, you can filter entries by the phase of that seasonal stage.
One thing that I have been using the filters for a bunch is to see all the times that I found a particular species at the peak time for foraging in my area. It's been incredibly helpful to me, and I think it will be for you too!
Also, if you happen to add an entry and you see only the following seasonal stages: "Flowering, Fruiting, Vegetative, Underground Part", those are the default generic stages for a species for which we have specifically defined the seasons. So please let me know if you encounter that and with what species, so we can define them.
Of course, if you search for a species and cannot find it, definitely let us know that as well, so we can add it to our database! We worked hard to get in as many species as possible.
What's next?
We are hard at work on our Gather Together feature, which will allow you to choose to share an entry publicly or with a closed group of friends. (Entries will continue to be private by default).
We’re also working on the ability to export your journal entries if you ever need to!
If you ever have any feature requests for the foraging journal, you can always use the Feature Request tool from your profile!
Happy foraging!
Jesse
Creator - Gather: The Foraging App
Was this helpful?
Still need help? Ask the team